Being a self-taught artist is something of a two-edged sword. If you make a success of it – find fame, perhaps, or earn a living from it – then you can wear the label as a badge of honour. If, on the other hand, you do as most of us do and make slow and stuttering progress towards something approaching mediocrity then being self-taught is probably best not mentioned – at least, not to the artistically educated. After all, self-taught at best equates to badly-taught and at worst to not taught at all.
Teaching yourself to paint is probably an ill-advised and certainly an inefficient undertaking. Without a tutor to guide you through a structured learning plan, to assess your work and to explain your failures, progress will inevitably be slow and haphazard. You can look forward to periods of drought and discouragement when ideas fail to materialise and your best efforts produce only disappointment. And if you are trying to teach yourself how to paint in watercolour, it can be even worse. Why?
What do you do when a watercolour goes wrong? Well, I know what I used to do: abandon it and start something else. Note: something else. Not a repeat of the same subject – which is now tainted by failure – but start the same process all over again with fresh subject matter. Not surprisingly, all too often I’d get the same result as before. As I’ve described elsewhere, correcting a watercolour is not easy and to a greater or lesser extent destroys the freshness and sparkle of the original washes. Being a purist about the medium (like many amateur watercolourists), I hadn’t the stomach to engage in re-working a painting by scratching and scrubbing away at it. So I’d start another one.
You can see the problem here: I wasn’t learning from my mistakes, I was simply repeating them. Had my chosen medium been, say, oil or acrylic I could have wiped out or painted over the offending bits without disturbing my sensitivities. When I did eventually force myself to attempt to correct my failures (learning a few tricks along the way), I soon realised that the failures were more to do with compositional problems than technical ones. And then along came Photoshop…
re-working in Photoshop
Photoshop for painters? Surely Photoshop is for photographers – isn’t its purpose photo-editing – ‘air brushing’ and the like? Yes, but over the years, as it evolved into a complex and extremely sophisticated tool for manipulating images, somewhere along the line it also acquired a number of features which enable it to be used to actually create images from scratch; in other words, to paint.
You can work with virtual brushes which can be tailored to your requirements, even simulating the effects of specific media like oil or watercolour. This is an example of a painting done entirely within Photoshop – it’s a copy of a detail from a painting (‘Model Reading’) by Sir William Russell Flint.

While painting with Photoshop is a fascinating way to make art, it does involve a lot of familiarisation with its many features before you can get started. However, it is much easier to use Photoshop to re-work your existing paintings – paintings that you’ve decided are failures or paintings that you feel need further work but you are unsure of how to proceed. All you need is a digital camera or a scanner to provide an image to work on. The big advantage of re-working in Photoshop is that whatever changes you make to your painting, they do not have to be permanent. While I can’t give a detailed description of how to use Photoshop – there are endless excellent tutorials on the web – I will try to give an overview of those features that are relevant to re-working before describing an example of the process with one of my own failures.
I mentioned that manipulating an image with Photoshop is non-destructive. Not only can you reverse any changes – go back to a previous state of the image – you can do this while still retaining the changes you have made but making them ‘invisible’. Doing this allows you to create a series of experiments on the image from which you can ultimately choose the most successful.
The key to this flexibility lies in Photoshop’s use of layers. When you first load an image into Photoshop, it is assigned to a Background layer. If you copy this layer (Layers>Duplicate Layer), you will now have a second layer (Background copy), identical to the first and sitting on top of it in perfect registration so that all you see is the top layer. You can now make changes to this copy without affecting the original on the Background layer.
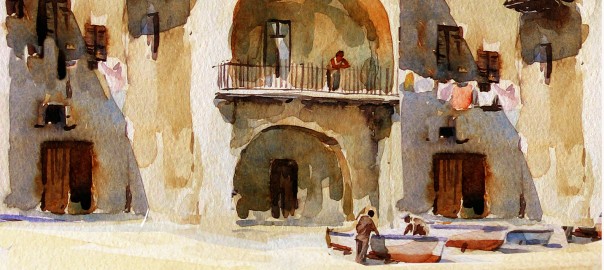
I’ll use this painting, which I’ll call ‘Fishing Village’ and which was painted some years ago, to illustrate some Photoshop effects.

I discarded this painting because I felt the composition was weak and there was something wrong with both the colour and tonal design. You can see previous (unsuccessful) attempts to re-work the water in the foreground by washing out. To some extent, the problem lay with the paper which seemed to subdue the washes. This painting is typical of many failed watercolours: I know there’s something wrong, but I can’t figure out precisely what it is. There are several very simple manipulations in Photoshop which are worth trying at the outset and which often suggest a direction to go in.
To the right of Edit on the toolbar is the Image option. The features in the Image menu and sub-menus allow you to make changes to the colour and tonality of the image.
If you click on Image, you should see three operations called Auto Tone, Auto Contrast and Auto Color. This is the result of applying the Auto Color option under the Image menu. This increases the colour saturation and tonal contrast and seems to be an improvement.

Now look at this image.

You can see there are some radical changes to the composition. The central facade of the building has been chopped in half and the right section is now a match for the left. Also the boat on the left has been removed. The format is now portrait rather than landscape. How has this been done?
If you click on the Edit menu on the toolbar you’ll find familiar features like cut, copy and paste – just as you would in a text-based application like Microsoft Word. But in Photoshop these same operations are used on images – or parts of images – rather than on text. You’ll also notice three other options: Undo, Step Forward and Step Backward. Undo will undo the last change made to an image; Step Backward allows you to undo a number of changes one at a time; and Step Forward does the reverse. These operations make experimentation very easy in Photoshop: any change can be immediately reversed if it is unsuccessful.
Mid-way down the Edit menu is the Transform feature. If you click on this it will reveal a set of operations which mathematicians call transformations: they include Scale, Rotate, Skew, Distort and Flip Horizontal/Vertical. Used in conjunction with copy and paste, these operations are powerful compositional tools. To exploit them fully, we need one more tool: some way to allow us to select parts of an image. Actually, Photoshop provides us with several selection tools, but I find one sufficient: the Polygonal Lasso Tool which enables you to select irregular shapes and pick out elements of subject matter accurately and easily with a succession of mouse clicks.
Getting back to the example, the first step in re-composing the image involved selecting, copying and immediately pasting the left hand section of the building facade. When you paste in Photoshop, by default it will always paste into a new layer on top of the copied layer. The Layers panel (click Window>Layers if it is not visible), now shows three layers: Background, Background copy and Layer 1. The currently selected layer is now Layer 1. However, you won’t see any difference in the image. This is because new layers are always created as 100% transparent – so where the top layer has no content then the content of the layer below will be visible. In this case, the content of Layer 1 is only the left hand section of the image. If you were to make the Background and Background copy layers invisible by clicking on the eye icon to the left of each layer’s name in the Layers panel, only the pasted section of the image would be visible.
The next step was to move the pasted section (using the Move tool at the top of the left hand toolbar) so that it covered the right half of the main facade – effectively cutting the facade in half. A little more work was needed to get the perspective and proportion of the pasted section to look right. This was done with the Transform tools Scale and Distort (I could have used Perspective as well). The same tools were used to reshape the roof: a section of sky was copied and pasted and then ‘stretched’ with the Scale tool to overlap the unwanted part of the roof and define the edge of the new roofline. The same stretching/scaling trick was used to redefine the foreground beach and eliminate the left hand boat. The figures and boats on the right were selected, copied and pasted and then moved to a more central position.
One more tool was used to tidy up the details: the Clone Stamp. This tool allows you to paint over an area of the image and replace the content with the content from another area of the same image. It’s a little tricky to get the hang of but it but it can prove very effective as a remodelling tool. Remember the figures and boats were moved? The problem doing this was that it left part of the original image of the figures and boats still visible to the right of the newly pasted copy. The Clone Stamp tool was used to ‘paint’ a section of beach over the unwanted subject matter. If you look carefully at the pasted right hand slice of the building, you’ll notice that it is no longer a perfect copy of the original: a line of washing has disappeared and there is some variation in the architecture. Again, the Clone Stamp was responsible.
Because re-working changed the format of the composition from landscape to portrait, I had to crop the image to remove the unwanted sections. This is easy in Photoshop: first select the part of the image you want to keep using the Rectangular Marquee tool and then click Image>Crop.
The final phase of re-composing involved more features from the Image menu.
Click on Image, select Adjustments and then Variations from the sub-menu. Variations allows you to adjust the colour balance of the whole image. (If you can’t find the Variations feature in the adjustments menu – it sometimes fails to install – then the Color Balance option does much the same thing but without the benefit of image thumbnails to help compare results.) The next image is the result of choosing the More Yellow and More Red options in Variations.

I find that most paintings seem to look better when the colours are predominantly warm. (I don’t mean a painting of all reds and yellows; but simply a bias in all of the colours – including blues and greens – to the warm side of the temperature range.)
I mentioned earlier an attempt to improve the foreground reflections by washing out. The last image demonstrates a way to re-work it in Photoshop. A section of the facade was copied and pasted, flipped vertically (Edit>Transform>Flip Vertically) and then moved into position. The Eraser tool was used to match the pasted reflection to the edge of the beach. A final touch was to apply Photoshop’s Wave filter (Filter>Distort>Wave) to the reflection to suggest some movement in the water.

Using the tools I’ve described here it’s possible to re-work subject matter, colour and tonality in a painting without even getting your paints out. Whilst it’s true that getting started with Photoshop is a steep learning curve, if you are trying to go it alone as a painter and find yourself facing another ‘block’, then it’s a wonderful tool with which to experiment and explore every aspect of the picture-making process in an enjoyable way.